
How To - Add a Pump

How to Add a Pump to the HUG Hydronics In-floor Heating System?
Video Coming Soon!

1. Turn off the HUG Hydronics in-floor heating system by the power switch on the power supply.
Check to make sure the “Power” light on the control board is off.
2. Remove the tank cover.
3. In your tank choose a pump location, usually the first one open from the left.
Use your planned location to choose the holes to run the blue hoses through.

4. Connect the blue hoses with the 2 blue ends to the new loop's PEX pipe.

5. Connect the blue end of the blue hoses with the white pipe to the return side of the new PEX pipe loop.

6. Run the unconnected end of the blue ended hose into the top of the tank through the chosen hole number.

7. Connect the blue hose in the tank to the pump. Slide it all the way on to the pump's hose attachment.


8. Stick the white pipe end of the return hose into the hole for that pump's return hose.
Push it into the tank until it will go no further.


9. Stick the nose end of the new pump into the groove and set it down in alignment with the other pumps.

10. Slide the box on the pump cord into its groove below the control board.


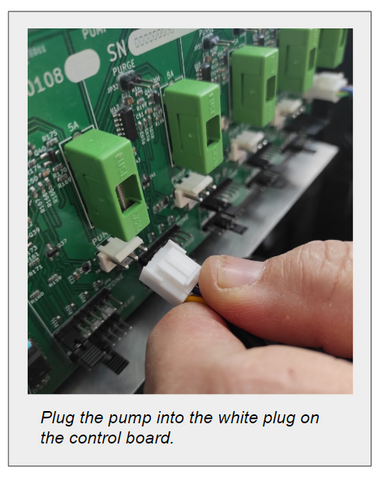
11. Plug the pump into the white pump plug on it's section of the control board.
The holes between the pump cord boxes and the control board can be used to pull any excess wire through.

12. Purge the Pump
Turn on the HUG Hydronics Tank by using the switch on the power supply.
On the control board, put a jumper on the “purge” pin for the new pump. The air will move out as the water fills the loop.
It is done when the gurgling sound ends.
Remove the jumper from the “purge” pin.

13. Chose the thermostat zone and speed settings for your new pump.
Use the jumpers on the control board to choose the thermostat zone and speed setting desired.
Standard Speed Settings:
- single loop = low
- double loops = medium

A Low Priority Zone
You may choose thermostat zone 4 to be a low priority so it will only heat after others are warm.
Connect that thermostat wire to be zone 4 and put a jumper on the “Low Priority” pins. If Zone 4 is in low priority mode and is calling for heat while any other zone is calling, then the “Zone 4” LED will glow dim yellow to indicate that it wants to heat now, but it is overridden.

14. Finishing Details
Add water to the tank as needed to reach the “full” level, about 3 gallons per loop.
Close the tank and lock the lid into place.

