
How To - Connect Thermostat

How to Connect Your Thermostat(s) to your HUG Hydronics Control Board?

1. Route Thermostat wires.
The thermostat wires are often run through the walls and will emerge from a little hole somewhere in the utility room.

Just below the middle of the control board is a hole to pull the thermostat wires through.

Give yourself enough slack in these wires to not only reach the front of HUG Hydronics tank, but also to move the tank by 12-18”
2. Gently pull out the 12 pin wire connector from the bottom center of the control board.


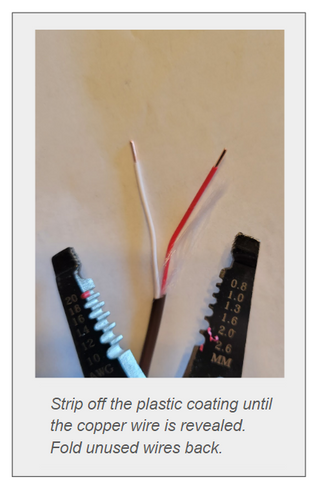
3. Strip the end of the thermostat wires.
Take a tool and cut about 2 inches of the outer sheath of the thermostat wire.
Inside you will see a white and a red coated wire .
You are going to strip the plastic insulation off each of the thermostat wires.
Insert wire into the connector. Mark with your fingers how deep it goes in. Strip the wire to this point, 1/4 to 5/8".
Using a wire stripper tool makes this easier.
4) For each thermostat: Connect the wires by:
1. Stick the white wire in the connector for the appropriate thermostat zone number.
2. Tighten the little screw, and turn to the right (clockwise) as tight as it will easily go. This should hold the wire securely and make the electrical connection possible.
3. The red wire will go in one of the power terminals (R). Tighten as with the white wire.
4. Do not plug the connector back into the control board yet.

Additional Steps for smart Thermostats

- Jumper #JP43 (the one above the “power” section on the control board) needs to be removed to power the smart thermostat. Go ahead and do this now.

-
Strip 3 wires from the thermostat wires, the white, red, and a blue or black (common) wire.
-
Connect the white wire to the thermostat zone you wish to connect it to.
-
The red wire goes into a power terminal (R).
-
The blue or black goes into a Common terminal (C), if you need to you can insert 2 wires of the same size in one of the Common terminals (C).
-
Do not plug the power supply into the outlet until it is time to power up. It has 2 wires. They will have to be stripped and inserted into the connector.
-
One is inserted into an R spot, the other into a C spot.

Do not plug the connector back into the control board yet.